A recent achievement of mine involved setting up a local GitLab Runner for a side project. 👏
Creating a server to run our CI/CD pipelines was an incredible experience! I learned how the process works for tools typically provided but with the benefit of having control long-term.
This adventure involved working on a team of 4 developers. As we built, I wanted to bring a CI pipeline for smoother and faster development (we haven’t yet deployed, so no CD just yet). There’s one less thing to worry about in code reviews if you know in advance something will break the build, doesn’t follow linting rules, or doesn’t pass the tests.
We’re using a free GitLab account for now; 400 monthly compute minutes are included, but we weren’t sure how much we would need to use each month upon implementation.
It might be overkill, but I wanted to take on the challenge. So now we use a local GitLab Runner!
- In part 1, I’ll share the first steps of setting up a GitLab Runner.
- Part 2 will discuss how I moved the GitLab Runner to a Raspberry Pi
We’ll cover:
- 👉 Some Basic Terms
- ✅ Three Main Steps
- 📝 Experience Synopsis
Let’s start by building shared understanding. I’ve added links for further reading, but I won’t go too deep!
👉 some basic terms
CI/CD, or Continuous Integration Continuous Delivery/Deployment, is a best practice in developing software. It allows frequent automated checks when changes are ready to be considered for a merge with the overall team repository.
It’s recommended to add this processing early in the project development cycle. If you wait until your project has grown large, issues that could have been easily identified during each CI/CD check and resolved more quickly than trying to work through a big stack of issues all at once will emerge.
If you’re not familiar, GitLab offers version control which is widely used to manage code changes and archive a revision history. This is especially handy to “roll back” changes if something goes wrong!
GitLab is a distributed version control system that allows multiple developers on multiple computers - and even multiple geographic locations - to collaborate. With the rise of remote work, and in my own experience, this is far more popular than a centralized version control system, which stores a repository on a single server or developer’s local machine.
Here’s a link to more reading about version control and GitLab.
✅ three main steps
The following outlines my process with links to GitLab’s excellent documentation and tutorials. If you’d like to try any of these, I recommend using GitLab docs, as I found them exceptionally valuable and easy to follow!
Before starting, I needed:
- a GitLab project set up to create a pipeline to use on the new GitLab Runner. Thankfully, we had the frontend and backend projects already set up.
- a maintainer or owner role for the project. I joined an existing project with basic access, so I requested access.
- to determine the machine(s) to use for the GitLab Runner. I decided to start with my MacBook I use for personal projects.
Once the project was set up and the correct permissions were confirmed, my general steps included:
- Create a GitLab Pipeline
- Install and Create a GitLab Runner
- Register the GitLab Runner for the Pipeline
create a gitlab pipeline
The GitLab pipeline tutorial states that Runners should be available before starting, but my process began with the pipeline itself. Setting up the CI pipelines was the original goal. I wanted to take small, iterative steps.
I built 2 working pipelines using a GitLab.com Runner first.
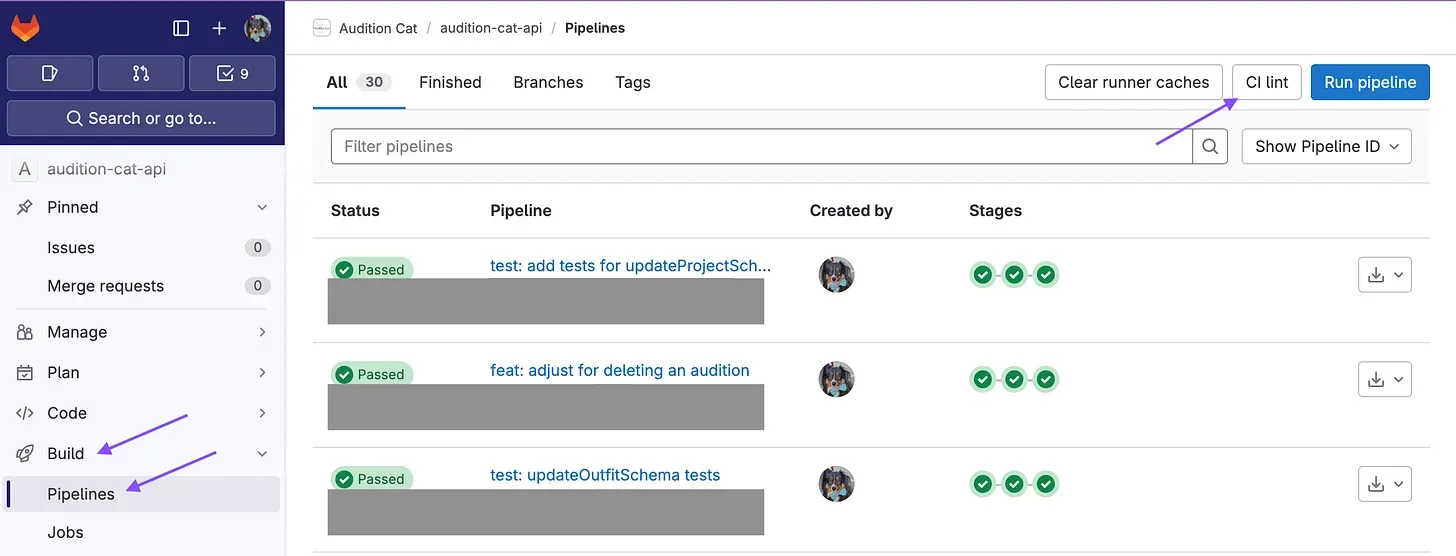
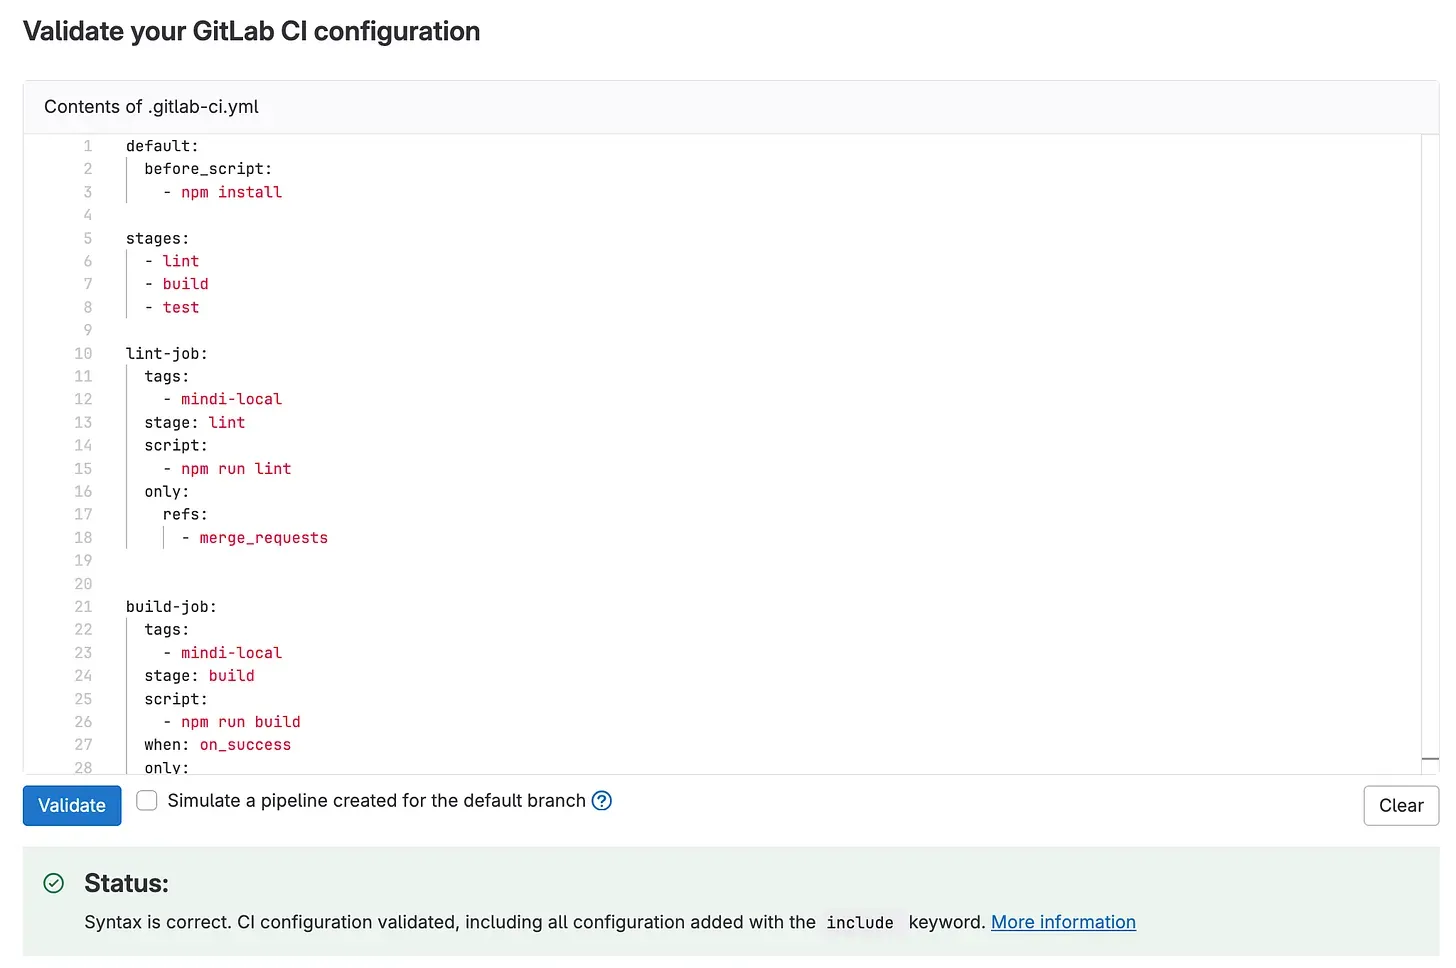
One of the best tools was the CI lint tool which performs a YAML file check to identify invalid syntax and rules. It significantly helped when trying to tweak the pipelines!
This can be accessed under the Build option in GitLab > choose Pipelines > and select the CI lint button in the upper right corner.
Here, you can enter your YAML file contents and click on Validate which will show you any linting issues or invalid syntax.
install and create a gitlab runner
After a short celebration 🎉 I moved to the next challenge: installing a local Runner.
The first step is to install GitLab Runner onto the chosen machine. I planned to keep it simple at first, using my MacBook. It’s important to remember that GitLab Runner is ultimately an application running on your device. We’ll discuss this in the synopsis, but here are some more details from GitLab.
I found the installation steps and followed the macOs directions. A Runner can be installed on many operating systems and architectures, but not all of them. We’ll talk more about this in part 2.
The installation was relatively easy, and I didn’t run into too many issues.
Next, a new Runner needs to be created within GitLab to connect with your project(s). This step will also generate a token you’ll use later. This can be accessed under the Settings option in GitLab > choose CI/CD > locate Runners and click to Expand.
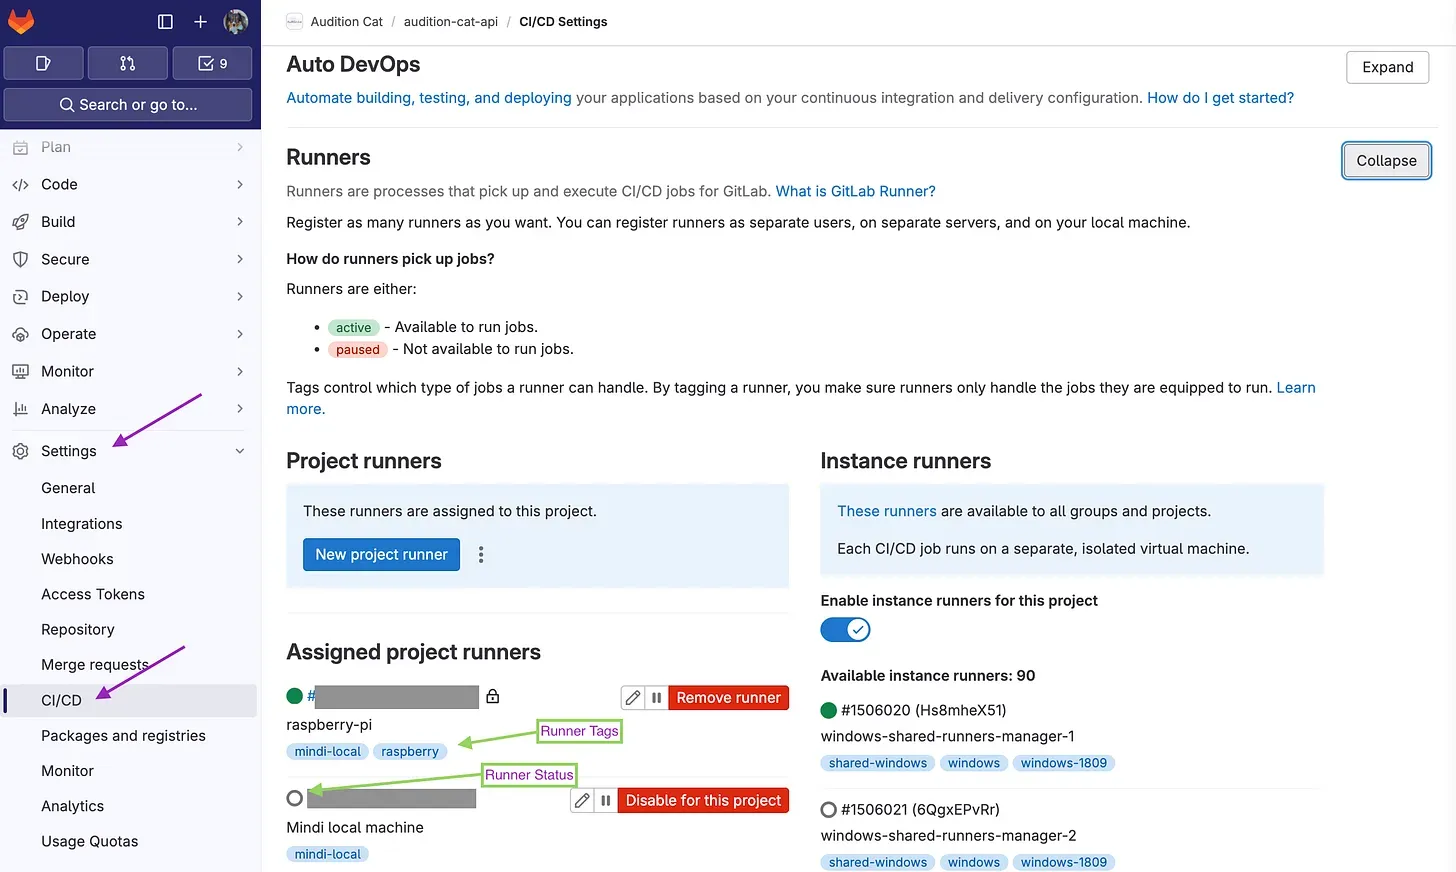
Here, choose “New Project Runner” and enter basic details like the tags you want to use and the name of the Runner. For instance, I used a tag in the .gitlab-ci.yml for the CI pipeline to trigger on a specific Runner: mindi-local. I opted to create project-level Runners for both the frontend and backend repos, and these steps were necessary for both projects.
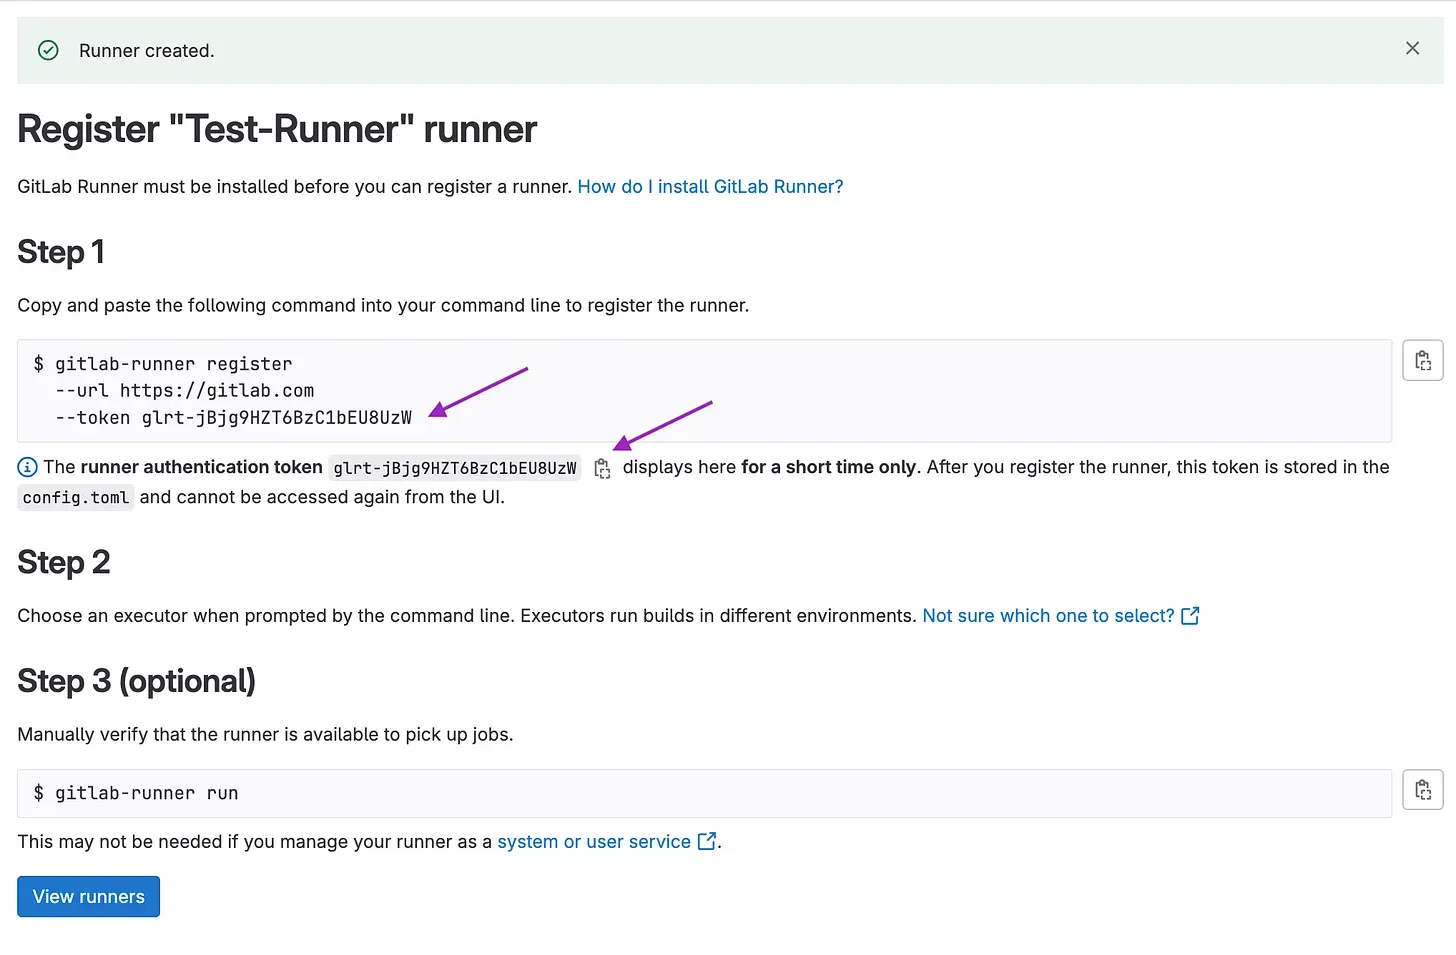
Upon creation, leave the new Runner confirmation screen up. There are registration directions, but more important, your token is only visible on this screen unless you copy/paste it elsewhere.
Let’s move on to the next step.
register the gitlab runner for the pipeline
Once installed, it’s necessary to register the Runner. Here was where I found it a little tricky. There are some basic directions on the GitLab screen you have open from the step above.
The biggest challenge was navigating the CLI to access the config.toml file to look over the settings. With practice, it became easier to access and update.
Extra details about the config.toml file and a GitLab Runner commands reference.
From here, the CLI was not too difficult. I ran this to start registration:
gitlab-runner register…and then followed the prompts.
- Enter the GitLab URL to use. I chose to use
https://gitlab.comfor simplicity. - Enter the Runner authentication token provided on the creation screen, pictured above.
- Enter a name for the Runner.
- Enter the type of executor. I chose
shellfor my use case in the CLI.
After successful registration, all that should be needed is:
gitlab-runner start
gitlab-runner run
…and your local Runner should connect and begin listening to GitLab for new pipeline jobs to run locally!
It helped that I had preemptively added matching CI pipeline tags to the .gitlab-ci.yml and the Runner created on the GitLab site. Once properly up and running, the CI pipeline ran without issue. 👍
As it was my first time, I had to do some troubleshooting, mainly for settings. Don’t be surprised if it doesn’t work perfectly the first time. However, I was able to figure everything out with a bit of research!
📝 experience synopsis
Generally, the process was manageable and a fun challenge!
Have I mentioned the GitLab documentation is great? 😅 Seriously, it was an excellent resource and helped me get “unstuck” more than once.
A positive of the GitLab Runner is that it’s open-source! The barrier to entry is pretty low. It has no language-specific learning requirements, and pipelines are set up by simply adding a YAML file to the project’s root. With the YAML file, I set up a relatively simple CI process in one day, running scripts from the package.json file.
On the other hand, I faced a significant challenge keeping the Runner active on my MacBook. This left me with less computing power for development. Remember when I mentioned that the GitLab Runner is essentially an application on your machine? Keeping the Runner “open” meant that the application was running in the background, consistently pinging - or checking in with - GitLab to see if there were any jobs to run.
I would turn off the Runner to gain more resources, only to manually turn it back on when a PR was submitted to run the pipeline.
For obvious reasons, this manual back-and-forth wasn’t optimal. Instead, I considered how I could approach this another way. I remembered a Raspberry Pi I hadn’t used in some time. It was the perfect option for a local Runner I could keep open for the team!
In part 2, we’ll talk more about how it went moving the local GitLab Runner to a Raspberry Pi. I learned a LOT in this second part!
Looking forward to it, see you then! 👋
// comments
Loading comments…
leave a comment